
TL;DR
Soundproofing and dampening are different. To quiet your rig, move it away or put it in a closet with proper ventilation. Strategic placement and sealing gaps are more effective than just adding foam.
Ever tried to record vocals or run a noisy AI rig in your tiny closet and ended up with echoes or a booming mess? It’s frustrating. The secret isn’t just slapping foam everywhere but understanding how sound works and where to place your treatment for real results.
This guide cuts through the noise—pun intended—and shows you how to tame acoustics, block sound leaks, and even turn your closet into a mini studio or a quiet server room. Whether you’re building a budget setup or want a professional-sounding space, these tips will save you time and headaches. You can learn more about acoustic dampening and placement techniques.
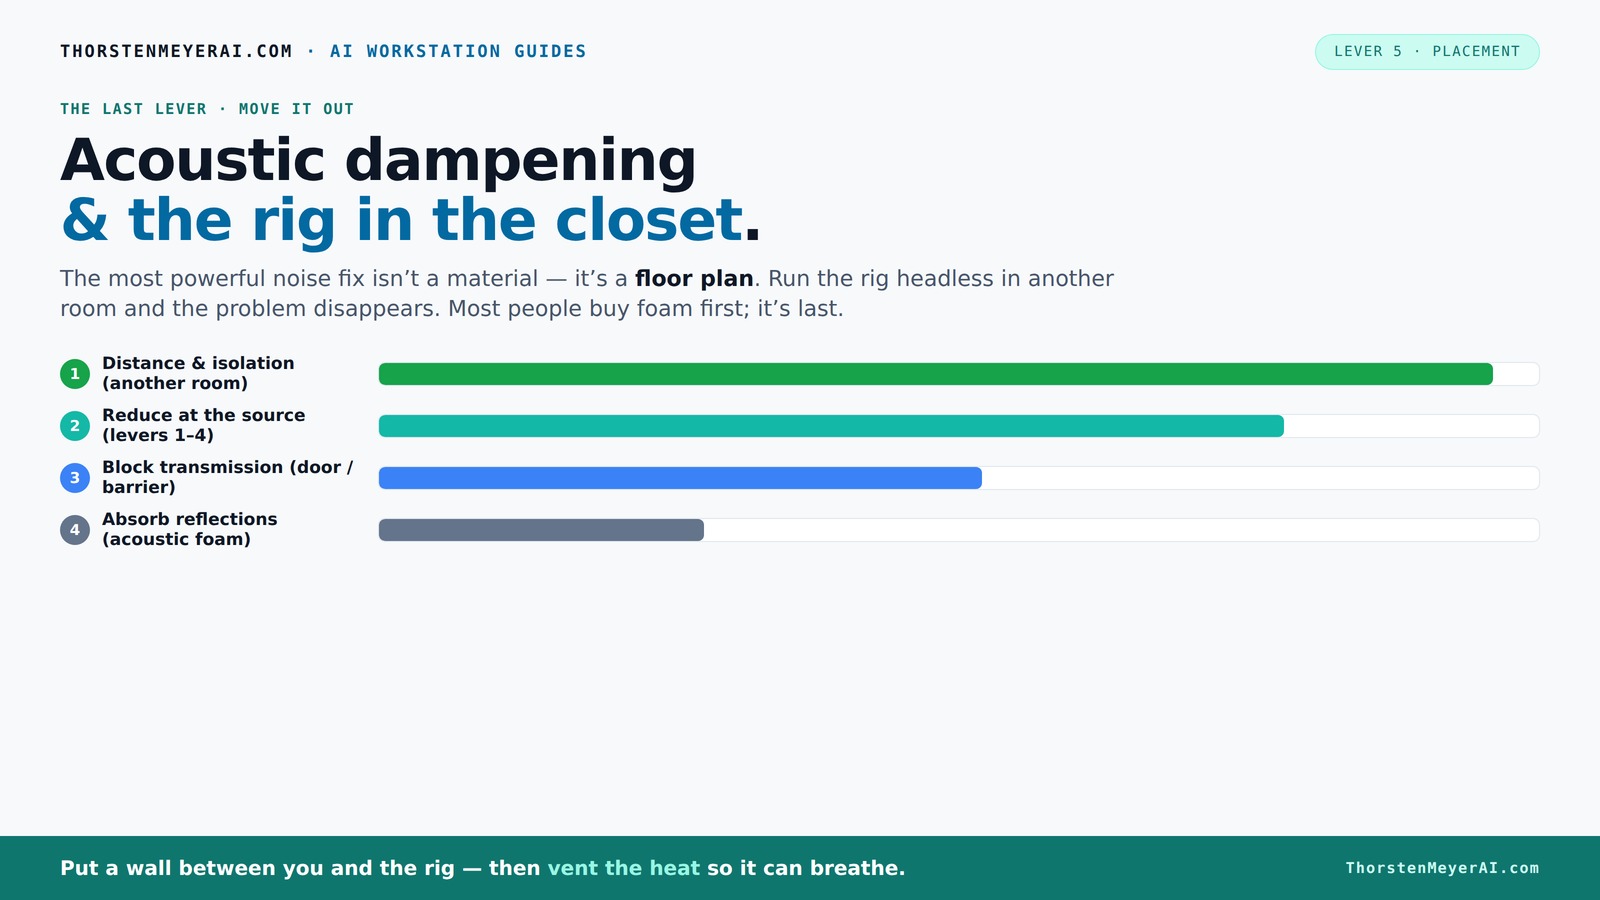
Acoustic dampening
& the rig in the closet.
The most powerful noise fix isn’t a material — it’s a floor plan. A rig you can’t hear because it’s in another room beats any amount of foam. Tap the approaches in Part 1 to see what actually works.
(another room)
(levers 1–4)
(door / barrier)
(acoustic foam)
Contain the noise, not the heat
Key Takeaways
- Sealing gaps and cracks around doors and corners dramatically reduces sound leaks in small spaces.
- Target treatment placement around the mic position for maximum vocal clarity and bass control.
- Thicker broadband panels and bass traps outperform foam for low-frequency issues in tiny rooms.
- Ventilation is critical in closet rigs—use passive vents or thermostatic exhaust fans to keep hardware cool and quiet.
- Don’t forget: moving your rig into another room is often the easiest way to silence noise altogether.

Focusound 52 Pack Acoustic Foam Panels 1" x 12" x 12" Sound Proof Foam Panles Soundproofing Noise Cancelling Wedge Panels for Home Office Recoding Studio with 300PCS Double-Side Adhesive
Soundproofing - Acoustic foam panels triangular grooves structure for better noise absorption, helps to reduce and absorb unwanted...
As an affiliate, we earn on qualifying purchases.
As an affiliate, we earn on qualifying purchases.
Why Acoustic Dampening Isn’t the Same as Soundproofing
Acoustic dampening stops echoes and harsh reflections inside your room. Soundproofing, on the other hand, blocks sound from escaping. Think of it like curtains versus a wall. You can reduce reverb with foam, but that won’t keep noise from leaking out.
Understanding this distinction is crucial because many creators mistakenly invest solely in foam panels, expecting complete silence. However, if your goal is to prevent sound from disturbing neighbors or escaping your room, you need to focus on sealing gaps and adding mass. The tradeoff is that soundproofing often requires more effort and cost—like adding dense barriers or constructing a room-within-a-room—compared to simply reducing echoes. Recognizing these differences helps you allocate your resources effectively: dampening improves sound quality within the space, while soundproofing controls noise leakage. Combining both, with an emphasis on sealing and mass, yields the best results for a small closet studio.
In essence, the key is understanding what each approach does and choosing the right balance based on your primary concern—whether it's internal acoustics or external noise leakage.

8 Pack - Bass Traps Acoustic Foam Corner, 8''x8''x12'' Black Bass Traps Corner Studio Foam, High Density and Fire-Proof Acoustic Panels Recording Studio Acoustical Treatments
Acoustic Principle- Bass Trap is a kind of sound absorbing structure specially used to absorb specific low-frequency standing...
As an affiliate, we earn on qualifying purchases.
As an affiliate, we earn on qualifying purchases.
Where to Place Acoustic Treatment for Vocal Clarity
The best place to start is behind and around the microphone. In a tiny closet, this might mean installing a thick panel directly behind a vocal mic or a reflection filter to cut down on room sound.
For instance, if you're recording vocals, place a bass trap or broadband panel at the point where your voice hits the wall. Cover reflective surfaces — like the ceiling and side walls — that face your microphone.
Remember: small rooms cause low-frequency buildup. Thick panels absorb more bass, so consider adding bass traps in corners or using thicker broadband panels for mid and low frequencies. This targeted placement makes your recordings sound clearer and fuller, even in a cramped space.
Pro tip: always determine your mic position first, then treat around it. That way, you’re addressing the actual reflection path, not just throwing foam around blindly [3][5].
Strategic placement is vital because it directly influences how sound interacts within your space. Proper positioning of panels ensures you're targeting the reflections that cause muddiness or echo, rather than wasting treatment on areas that don't impact your recording quality. This approach maximizes the effectiveness of your treatment and prevents unnecessary expenses or clutter. For more insights, visit supportbreakfast.com.

SQKM Weather Stripping Door Seal Strip, D-Shaped Self-Adhesive, Soundproof Blocks Cold Drafts & Dust, Black TPE 20Ft (3/8" W × 1/4" T) for Door Frames & Windows
【THICKENED TPE SEAL & SAVE】Crafted from premium thickened TPE, this D-Shaped Weather Stripping boasts strong sealing and anti-deformation...
As an affiliate, we earn on qualifying purchases.
As an affiliate, we earn on qualifying purchases.
How to Seal Gaps, Doors, and Corners in a Closet Studio
Gaps around doors and cracks are the biggest noise leaks in any closet. Sealing them is a game-changer. Use acoustic sealant or weatherstripping around the door frame to block sound from escaping. Learn more about sealing gaps and treating corners effectively.
For example, adding a heavy blanket or acoustic curtain in front of the door can drastically cut noise leaks. In some cases, even a simple draft stopper or foam strip works wonders.
Corners are low-frequency trouble spots. Install thicker panels or bass traps in the corners where walls meet the ceiling and floor. This prevents standing waves and low-end boominess common in small spaces. The goal: make the room’s shape less reflective and resonant.
Sealing gaps and treating corners isn't just about blocking sound; it’s about preventing low-end buildup and reducing resonances that can muddy your recordings. Gaps and cracks act like leaks, allowing sound to escape or enter, which can compromise your privacy and cause noise disturbance. Proper sealing enhances overall sound isolation and improves the fidelity of your recordings by reducing unwanted low-frequency resonances that are hard to control with treatment alone. The tradeoff is that meticulous sealing takes time but yields significant improvements in clarity and noise containment.
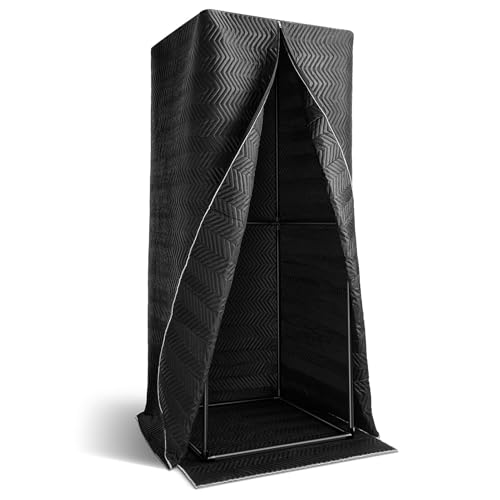
Moukey Portable Vocal Booth, One-piece Design Recording Booth with 720 Degree Sound Dampening, Home Studio Soundproof Booth for Voiceover, Podcast, Singing
Upgraded Sound Absorption - The Moukey vocal booth features a thickened but air-permeable sound insulation blanket, filled with...
As an affiliate, we earn on qualifying purchases.
As an affiliate, we earn on qualifying purchases.
Using Foam, Panels, and Blankets — What Works Best?
Not all acoustic treatments are created equal. Foam panels are great for reducing echoes, but they don’t block sound. Thick broadband panels absorb a wider frequency range and are better for vocals and low-end issues. For a deeper dive, check out treatment options.
For example, a DIY creator might use inexpensive foam in the corners for echo control but install heavy bass traps at the walls’ junctions for bass management.
Blankets and moving blankets are surprisingly effective, especially in rental spaces. They’re quick to install and can be moved or removed without damage.
In serious setups, heavier broadband panels and bass traps outperform thin foam. For instance, a 4-inch thick panel absorbs frequencies from 125Hz to 4kHz more effectively than a 1-inch foam panel [3][5].
Choosing the right treatment depends on your specific needs. Foam is excellent for controlling early reflections and high-frequency echoes, but for dealing with bass and low-frequency issues, broadband panels and bass traps are essential. Using a combination tailored to your space ensures you get the best sound quality while managing budget and installation constraints. The tradeoff is that more substantial treatments cost more and take up space, but they deliver significantly better results in sound clarity and low-end control.
Handling Low-End Buildup & Standing Waves in Small Rooms
Low-frequency issues are common in tiny closets because parallel walls create standing waves. These cause boomy, muddy sounds that are tough to fix with just foam. You might find bass traps and acoustic treatment helpful.
Adding bass traps in corners helps. For example, placing broadband bass traps at the ceiling-floor junctions can reduce low-end resonance and produce a cleaner sound.
Another trick: slightly angling walls or adding diffusers can break up standing waves. If your low frequencies still sound muddy, consider an active subwoofer or a room EQ to tame the problem.
Research shows that in small rooms, thicker panels and bass traps outperform thin foam for bass control [3][5].
Understanding how low frequencies behave in small spaces is key because these frequencies tend to build up where walls meet, creating resonances that muddy your mix. Bass traps in corners absorb and diffuse these problematic frequencies, reducing muddiness and increasing clarity. The tradeoff is that bass traps and diffusers can be more expensive and occupy space, but they are crucial for achieving a balanced, professional sound in small rooms.
How to Keep Your Closet Rig Cool & Quiet — Ventilation Tips
Putting a high-powered rig in a closet is smart for noise reduction, but heat buildup is the enemy. Without proper airflow, your machine will throttle and roar louder.
Use passive vents or ducted exhaust fans to move hot air out. For example, a small quiet fan can keep the temperature stable without adding noise.
In sealed cabinets, consider a thermostatically controlled exhaust system that kicks in when it hits a set temperature. This keeps your hardware cool and quiet.
Learn more about cooling solutions for enclosed rigs in this guide on [reducing heat and noise in AI workstations](https://thorstenmeyerai.com/reduce-heat-noise-ai-workstation/). Proper ventilation prevents heat-induced throttling, keeping noise low and hardware happy.
Effective ventilation isn't just about cooling; it also impacts noise levels. Poor airflow causes fans to work harder, increasing noise. Conversely, good ventilation ensures your hardware runs efficiently and quietly, preventing heat-related performance issues that could force you to turn down your rig or risk damage. The tradeoff involves balancing quiet fans and vents with adequate airflow, but neglecting ventilation can lead to overheating and increased noise, undermining your quiet setup.
Practical Setup Tips for a Renter-Friendly, No-Drill Closet Studio
Drilling holes or making permanent modifications isn’t always an option. Luckily, there are renter-friendly solutions. Use freestanding panels, acoustic stands, and portable blankets.
For example, attach foam panels to lightweight frames that can lean or stand against walls. Hang blankets or use tension rods with acoustic curtains to seal gaps without damaging walls.
Flexible solutions like magnetic or adhesive-backed panels make setup quick and reversible. This way, you can transform a closet into a studio without risking your deposit.
Check out some DIY ideas for renter-safe treatment options that still deliver good sound control.
Choosing non-permanent solutions is essential for renters because it allows you to optimize your space without risking damage or losing your deposit. Using portable, freestanding, or adhesive-backed treatments enables quick setup and removal, making it easier to adapt your space as needed. The tradeoff is that these solutions may not be as effective as permanent modifications, but for most home studios, they provide a practical balance between convenience and sound quality.
Frequently Asked Questions
What’s the difference between acoustic treatment and soundproofing?
Acoustic treatment reduces echoes and reflections inside a room, making sound clearer. Soundproofing blocks sound from escaping or entering, keeping noise contained. In a closet, both are important but serve different purposes.
Where should I place panels in a small closet studio?
Start by treating the wall behind your mic, then cover reflective surfaces like the ceiling, side walls, and floor around your source. Focus on corners for bass traps to handle low frequencies.
Should I treat the walls, ceiling, floor, or door first?
Prioritize sealing gaps around the door and walls first. Then, treat reflective surfaces near your mic. For low frequencies, add bass traps in corners. It’s a layered approach for best results.
Do I need bass traps in a closet setup?
Yes, especially if you notice boomy lows or standing waves. Bass traps in corners reduce low-frequency buildup, making your recordings clearer and more balanced.
How do I keep sound from leaking through gaps?
Seal gaps with acoustic sealant or weatherstripping. Use blankets or acoustic curtains over doors. For tiny openings, foam strips or draft stoppers help block sound leaks effectively.
Conclusion
Quieting a rig in a small closet isn’t just about slapping foam on the walls. It’s about smart placement, sealing leaks, and proper airflow. Think of your space as a puzzle—fit the pieces together, and you’ll create a sound sanctuary.
Remember, the best noise solution is often distance. If you can, put your rig in another room or a closet with good ventilation. It’s easier than fighting a constant battle with echo and heat.
So next time you set up that tiny studio or AI rig, focus on sealing gaps, placing treatment strategically, and ensuring airflow. Your ears—and your hardware—will thank you.