
This guide helps you choose an air fryer that fits your kitchen, decide where to use and store it, and prepare it for cooking. It is for first-time buyers and anyone replacing an appliance in a compact home. The steps take about 30-45 minutes, not including shopping or cooking.

Get kitchen gear delivered free — and shop member deals
- Fast, free delivery on millions of items
- Access to Prime Big Deal Days deals on October 6–7
- Prime Video, Amazon Music and more included

Ninja AF101 Air Fryer, 4 Qt, 4-in-1, Grey
- ✔ Capacity: 4 quarts
- ✔ Functions: Air fry, roast, reheat, dehydrate
- ✔ Temperature range: 105°F–400°F
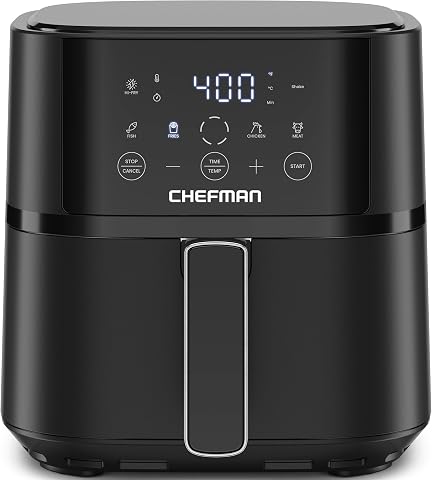
Chefman 4 QT Compact Air Fryer with Hi-Fry Technology, Touchscreen Controls and 4 Presets – Black
- ✔ Capacity: 4 quarts
- ✔ Maximum temperature: 450°F
- ✔ Power: 1500 watts

Chefman 2-Quart Digital Mini Air Fryer, Black
- ✔ Capacity: 2 quarts
- ✔ Dimensions: 10 × 10 × 8.3 inches
- ✔ Weight: 5.9 pounds
Difficulty: Beginner | Time: 30-45 minutes to choose and set up; cooking time varies by recipe
What You’ll Need
Tools & Materials:
- Tape measure or ruler
- Your usual serving sizes and a few common meals in mind
- Access to the appliance’s product dimensions and instruction manual
Knowledge:
- Basic familiarity with your counter, cabinets, and electrical outlets
- A rough idea of how many people you usually cook for
Check the air fryer’s full dimensions, including the space required around it for ventilation. Manufacturers may specify clearances or restrict placement under cabinets. Follow the manual for your exact model.
Ninja AF101 Air Fryer, 4 Qt, 4-in-1, Grey
The Ninja AF101 is our strongest all-around choice for a small kitchen because it combines a 4-quart capacity with four cooking functions. Air fry, roast, reheat, and dehydrate cover more everyday jobs than the Chefman 4 QT’s four presets, which are one-touch settings rather than separate functions. That flexibility can make one countertop appliance more useful across the week, especially when we want to warm leftovers or roast a small portion without pulling out another device.Its 105°F–400°F range also reaches lower temperatures than the two Chefman models, supporting gentle dehydration as well as standard air frying. For cooks who care most about very high-heat crisping, however, the Chefman 4 QT reaches 450°F and may be the more direct fit. The Ninja’s ceramic-coated basket and crisper plate are dishwasher safe, helping keep cleanup manageable. Its 4-quart capacity remains a limit for large households, and the exterior needs to be wiped by hand. We rank it first for doing the most in a countertop-friendly format, while recognizing that its footprint is larger than the 2-quart Mini’s.
Pros:
- Four functions make it more versatile than either Chefman model.
- 4-quart capacity balances compact sizing with room for shared portions.
- Low 105°F setting supports dehydration as well as everyday cooking.
- Dishwasher-safe ceramic-coated basket and crisper plate simplify cleanup.
Cons:
- The 400°F maximum is lower than the Chefman 4 QT’s 450°F.
- The exterior requires manual wiping, and 4 quarts can be limiting for larger households.
Best for: Small-kitchen cooks who want one 4-quart appliance for air frying, roasting, reheating, and occasional dehydration.
Not ideal for: People who mainly cook for one and want the smallest possible appliance, or households that need enough capacity for large family portions in one batch.
Bottom line: We recommend the Ninja AF101 for small kitchens that need a versatile 4-quart appliance and can spare more room than the Mini requires.
“We recommend the Ninja AF101 for small kitchens that need a versatile 4-quart appliance and can spare more room than the Mini requires.”
Chefman 4 QT Compact Air Fryer with Hi-Fry Technology, Touchscreen Controls and 4 Presets – Black
For cooks who want a compact appliance but put crisping ahead of extra cooking modes, the Chefman 4 QT Compact is our more focused alternative to the Ninja. Its 450°F Hi-Fry technology gives it the highest stated maximum temperature in this lineup, while the 4-quart basket provides room for more than a solo serving. That makes it a practical middle ground: more capacity than the 2-quart Chefman Mini, with a countertop-friendly design aimed at everyday portions.The touchscreen and four presets keep common settings accessible, though presets are less versatile than the Ninja’s four distinct cooking functions. We would choose the Ninja when roasting, reheating, or dehydrating in the same appliance matters; we would choose this Chefman when high-heat crisping is the priority. A shake reminder helps prompt more even cooking, but crisp results still depend on manually shaking food. The nonstick basket and rack are dishwasher safe, and automatic shutoff adds a useful safety feature. Its main compromise is role-specific simplicity: it brings high heat, not the broadest range of cooking tasks.
Pros:
- 450°F maximum temperature is the highest among these three models.
- 4-quart basket offers more room than the 2-quart Mini.
- Touchscreen controls include four one-touch presets and a shake reminder.
- Dishwasher-safe nonstick basket and rack make cleanup easier.
Cons:
- Four presets provide less cooking flexibility than the Ninja’s four functions.
- Manual shaking is still needed for the crispiest results.
- The 4-quart capacity may require batches for larger households.
Best for: Cooks with limited counter space who want a 4-quart air fryer and value a higher maximum temperature for crisping.
Not ideal for: Buyers seeking multiple cooking functions such as roast and dehydrate, or households that need a larger basket for family-size batches.
Bottom line: Choose the Chefman 4 QT Compact when high-heat crisping and a useful 4-quart capacity matter more than the Ninja’s broader cooking functions.
“Choose the Chefman 4 QT Compact when high-heat crisping and a useful 4-quart capacity matter more than the Ninja’s broader cooking functions.”
Chefman 2-Quart Digital Mini Air Fryer, Black
When saving counter space is the first priority, the Chefman 2-Quart Digital Mini is the clearest fit. Its stated dimensions are 10 × 10 × 8.3 inches, and its 2-quart square basket is designed for meals for one or two people. Compared with the two 4-quart models, it gives up substantial cooking room; in return, it is the easiest option here to justify in a kitchen where a larger appliance would crowd the counter or storage.Touch controls, an adjustable temperature range up to 400°F, a timer, and a shake reminder cover the basic controls without relying on a row of elaborate modes. The dishwasher-safe nonstick basket and rack also match the cleanup convenience of the larger Chefman and Ninja options. Its 900-watt power and compact capacity suit smaller portions, but this is not the pick for cooking multiple servings together. If we regularly cook for more than two, the Chefman 4 QT is the more practical step up; if we want roasting and dehydration too, the Ninja adds more flexibility. This Mini makes sense when a genuinely small footprint matters more than batch size.
Pros:
- Compact 10 × 10 × 8.3-inch dimensions suit space-constrained kitchens.
- Square 2-quart basket is sized for one or two people.
- Touch controls, timer, adjustable temperature, and shake reminder cover everyday use.
- Dishwasher-safe nonstick basket and rack simplify cleanup.
Cons:
- 2-quart capacity is substantially smaller than either 4-quart competitor.
- Not well suited to larger portions or cooking for a household in one batch.
- Its 400°F maximum does not match the Chefman 4 QT’s higher heat.
Best for: Solo cooks, couples, or anyone with very little countertop or cabinet space who prepares small portions.
Not ideal for: Families, meal preppers, or anyone who wants to cook several servings at once or use an air fryer for larger dishes.
Bottom line: Pick the Chefman 2-Quart Mini when the smallest stated footprint and small daily portions matter more than capacity or extra cooking functions.
“Pick the Chefman 2-Quart Mini when the smallest stated footprint and small daily portions matter more than capacity or extra cooking functions.”
As an Amazon Associate we earn from qualifying purchases.
Before You Start
Decide where the appliance will sit while cooking and where it will go when stored. Air fryers need a stable, heat-resistant surface and room for hot air to escape. Do not plan to run one inside a closed cabinet or place it where its exhaust points at a wall, curtains, paper, or another heat-sensitive surface. Check that the outlet is easy to reach and that the appliance can plug directly into it as the manual directs.
Air fryer capacities and basket shapes vary. A stated capacity does not tell you exactly how much food will fit in one layer. Compare the basket’s usable cooking area, exterior dimensions, and your typical portions before choosing.
Step-by-Step Instructions
Step 1: Measure the cooking and storage spaces
Measure the width, depth, and height of the counter area where you plan to cook. Include space for the handle, basket removal, power cord, and ventilation clearances listed in the manual. Then measure the shelf or cupboard where you plan to store the appliance, including the opening it must pass through.
Write down the maximum dimensions for both locations. Compare them with the product’s exterior measurements rather than its box dimensions.
Tip:Do not assume the appliance can sit under a low cabinet while running. Check the model’s instructions for overhead clearance and exhaust direction.
Check: You have a written maximum width, depth, and height for both cooking and storage, with any required clearances accounted for.
Step 2: Choose a style that suits your routine
Compare basket-style and oven-style models against your available space and the foods you cook most often. A basket model usually has a compact footprint and suits fries, vegetables, and smaller portions. An oven-style model may provide racks or more room for flat foods, but can take up more counter space.
Check whether the basket, tray, or racks can be removed and washed in your sink. Look at the controls and ask whether you can comfortably lift the basket and reach the handle in your planned cooking spot.
Tip:Favor a shape that fits your storage area and cooking habits over a long list of presets you may rarely use.
Check: You can explain why the chosen style fits your typical meals, available counter space, and cleaning routine.
Step 3: Match capacity to your portions
Estimate how many people you usually cook for and check the maker’s serving guidance. Look for the usable basket or tray area and consider whether your usual food can sit in a single layer. Overfilled baskets can block airflow and lead to uneven cooking.
If you often cook for several people, compare the time and effort of making two batches with the footprint of a larger model. Choose a larger appliance only if you have room to operate and store it safely.
Tip:For foods that need crisping, usable surface area often matters more than the advertised capacity alone.
Check: The model can handle your usual portions in one batch or you have accepted that some meals will need multiple batches.
Step 4: Check the practical details before buying
Confirm that the model fits your recorded measurements and that its voltage and plug suit your home. Read the manual or product details for cleaning instructions, dishwasher-safe parts, temperature range, controls, and any required accessories. Check the warranty and availability of replacement baskets or trays if those parts matter to your decision.
Review the appliance’s weight and handle design if you will move it between storage and counter regularly. Avoid assuming that every removable part is dishwasher-safe; confirm each part in the manual.
Tip:Account for the full routine: moving the appliance, cooking, cooling, cleaning, and storing it.
Check: The appliance fits the space and power supply, and you know how its cooking parts should be cleaned.
Step 5: Set up the air fryer safely
Place the appliance on a level, heat-resistant surface, then arrange it according to the manual’s clearance requirements. Keep the exhaust away from walls and items that could be damaged by hot air. Plug it into the recommended outlet without stretching the cord across a walkway or placing it near water.
Remove packaging and stickers from the cooking area, wash the parts as directed, and dry them before assembly. Run an initial cycle only if the manual calls for one, and follow its instructions for that cycle.
Tip:Keep the appliance out of a closed cupboard while it is operating. Let it cool fully before moving it into storage.
Check: The air fryer stands level with required clearances, the parts are clean and dry, and the cord reaches the outlet safely.
Step 6: Cook a small first batch
Choose a simple food and follow a recipe or the appliance instructions for temperature and time. Arrange food in a loose layer, leaving room for air to move. Start with a modest amount while learning how quickly your model cooks.
Pause to shake or turn food only when the recipe or manual recommends it. Use oven mitts or another suitable heat-safe grip to handle the basket, and place hot parts on a heat-resistant surface. Check that the food is cooked through before serving; use a food thermometer for meat or other foods that require a verified internal temperature.
Tip:Cooking times can vary with food size, starting temperature, quantity, and appliance model. Check early to prevent overcooking.
Check: The food is cooked to the required doneness, and you can remove the basket and hot food without contacting the heating element or hot surfaces.
Step 7: Clean, cool, and store the appliance
Turn off and unplug the air fryer, then let it cool before cleaning. Wash the basket, tray, or racks according to the manual. Wipe the interior and exterior as directed, keeping water away from electrical components and the heating element unless the manual gives specific cleaning instructions.
Dry all parts fully before reassembly or storage. Store the appliance where it will not block a walkway or require you to lift it over fragile items.
Tip:Clean grease and food residue after use so they do not build up or smoke during a later cooking cycle.
Check: The appliance is unplugged, cool, clean, dry, and stored in a place where it can be removed safely.
Common Mistakes to Avoid
- Buying by capacity alone. — Compare the appliance’s exterior dimensions and usable basket area with your space and usual portions.
- Placing the running air fryer under a cabinet or too close to a wall. — Follow the model’s clearance instructions and keep exhaust away from heat-sensitive surfaces and items.
- Filling the basket too tightly. — Arrange food in a loose layer or cook in batches so hot air can circulate.
- Putting parts in the dishwasher without checking. — Confirm which components are dishwasher-safe in the manual before washing them.
Troubleshooting
Problem: The air fryer does not fit the counter space as expected.
Solution: Recheck the product’s exterior dimensions, handle clearance, cord position, and required ventilation space. Move it to a measured alternate spot or choose a smaller model.
Problem: Food cooks unevenly or does not crisp.
Solution: Reduce the amount in the basket, leave space between pieces, and shake or turn food if the recipe recommends it. Adjust cooking time in small increments and check for doneness.
Problem: The appliance produces smoke during cooking.
Solution: Turn it off and unplug it if safe to do so. Let it cool, then check for grease or food residue and clean it according to the manual. For fatty foods, use the model’s guidance and stop if smoke continues.
Problem: The basket or tray is difficult to clean.
Solution: Soak removable parts only if the manual allows it, then use a nonabrasive sponge and the recommended cleaning method. Avoid metal tools or harsh cleaners that could damage a coating.
What Success Looks Like
You have an air fryer that fits the measured cooking and storage spaces, can be operated with the clearances required by its manual, and suits your regular portions. Its first batch cooks to the required doneness, and you can cool, clean, and store the appliance safely.
Next Steps
Keep the manual where you can find the model’s temperature, clearance, and cleaning guidance. After a few uses, note which quantities and cooking times work well for your usual foods. Clean residue after cooking and check that the exhaust area stays clear each time you set up the appliance.
Frequently Asked Questions
What size air fryer works for a small kitchen?
Choose based on both your cooking space and typical portions. Check exterior dimensions, required clearances, and usable basket area; a compact model may suit one or two people, while larger meals may require multiple batches or more counter space.
Can I keep an air fryer in a cupboard?
You can store it in a cupboard when it is unplugged and fully cool, if it fits safely. Take it out before use and follow the manual’s ventilation clearances while it operates.
Can I run an air fryer under a kitchen cabinet?
Only if the model’s instructions allow that placement and the required overhead clearance is available. Hot exhaust can damage nearby surfaces, so check the manual and the direction of the vent.
Do I need to preheat an air fryer?
It depends on the recipe and model. Follow the recipe or manual; some foods cook well without preheating, while others may benefit from it.
How do I keep the air fryer from taking over a small counter?
Measure a storage spot before buying, choose a model that is manageable to move, and return it to storage only after it has cooled fully. Leave it out while cooking so ventilation space remains clear.
Fall Picks
fall essentials
As an affiliate, we earn on qualifying purchases.