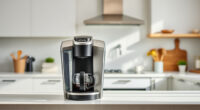
Getting your new Keurig K-Mini single-serve coffee maker ready for use is simple when you follow these clear, step-by-step instructions. Whether you’re a first-time user or just need a quick refresher, this guide will help you set up your machine safely and efficiently. Proper setup ensures you get the best flavor from your favorite K-Cup pods and keeps your brewer running smoothly.

Get kitchen gear delivered free with Prime
- Fast, free delivery on millions of items
- Prime Video, Amazon Music and more included
- Member-only deals all year
We’ll also cover some common troubleshooting tips and maintenance advice to keep your coffee experience enjoyable every time.
Key Takeaways
| Compact Design | Fits small spaces with less than 5 inches width. |
| Flexible Brew Sizes | Brew between 6-12oz depending on preference. |
| Easy Water Filling | Single cup reservoir requires fresh water each brew. |
| Quick & Fresh | Brews coffee in minutes for busy mornings. |
| Maintenance Tips | Regular descaling and cleaning improve taste and longevity. |
Unboxing and Initial Placement
- Carefully remove your Keurig K-Mini from the box and check that all components are present, including the brewer, power cord, and user manual.
- Place the coffee maker on a stable, flat surface near an outlet. The compact design makes it ideal for small kitchens, dorm rooms, or office spaces.
Preparing Your Brewer for First Use
- Fill the water reservoir: Lift the water reservoir lid at the back of the machine, pour fresh water into the reservoir up to the maximum fill line, then close the lid.
- Power on the machine: Plug in the cord, and press the power button. The machine will heat up; this is indicated by the LED lights or a blinking indicator.
- Run a cleansing brew: Place a mug on the removable drip tray, and run a brew without a K-Cup to flush out any manufacturing residues. Discard this water.
Brew Your First Cup
- Insert a K-Cup pod into the pod holder, ensuring it’s seated properly.
- Choose your brew size: Use the size selector to choose between 6-12oz depending on your preference.
- Press the brew button and wait for the coffee to dispense into your mug. The K-Mini brews quickly, typically in under a minute.
Routine Maintenance and Troubleshooting
- Descale regularly: Use a descaling solution or a mixture of white vinegar and water every 3-6 months to remove mineral buildup. Follow the descaling instructions specific to your model.
- Clean the drip tray and water reservoir: Wash these parts with warm, soapy water weekly.
- Address common issues: If the machine isn’t brewing, check the water reservoir for proper placement, ensure the power cord is plugged in, and run a cleaning cycle.
Additional Tips for Optimal Use
- Use filtered water for better taste and less mineral buildup.
- Don’t overfill the water reservoir beyond the maximum line.
- Use the removable drip tray to accommodate travel mugs up to 7 inches tall.
- Turn off the auto-off feature to keep the machine ready for frequent use, or set it for energy savings.
The Products in This Guide

Keurig K-Mini Single Serve K-Cup Pod Coffee Maker
- ✔ Color: Matte Black
- ✔ Power: 110V-120V
- ✔ Warranty: 1 year

My K-Cup® Reusable Coffee Filter
- ✔ Size: Fits standard Keurig machines
- ✔ Ease of Use: Simple to fill and clean
- ✔ Eco-Friendly: Reduces waste
Keurig K-Mini Single Serve K-Cup Pod Coffee Maker
The Keurig K-Mini offers a sleek, space-saving design with the flexibility to brew 6-12oz of coffee quickly. Its single-cup reservoir and travel mug compatibility make it perfect for small spaces and busy mornings. Regular maintenance, like descaling, ensures it continues to perform well.
Pros:
- Space-saving design
- Brews quickly
- Flexible brew sizes
- Removable drip tray for travel mugs
Cons:
- Requires frequent refilling
- No water filtration built-in
- Limited to K-Cup pods
Best for: Small kitchens, dorm rooms, offices, travelers
Not ideal for: Large households needing multiple cups at once, those seeking built-in filtration
Bottom line: Ideal for small spaces and quick, customizable brews.
My K-Cup® Reusable Coffee Filter
The My K-Cup reusable coffee filter is compatible with the Keurig K-Mini and other models, allowing you to brew your favorite ground coffee. It’s a cost-effective and eco-friendly option that gives you control over your coffee blend.
Pros:
- Cost-saving over pods
- Control over coffee strength
- Easy to clean
- Compatible with multiple Keurig models
Cons:
- Requires ground coffee prep
- May need a finer grind for best results
- Cleaning can be a bit tedious
Best for: Coffee lovers who prefer ground beans
Not ideal for: Those who only want K-Cup convenience
Bottom line: A sustainable choice for ground coffee brewing.
Frequently Asked Questions
How do I descale my Keurig K-Mini?
Mix equal parts of white vinegar and water, fill the water reservoir, and run a brew cycle without a K-Cup. Repeat with plain water to rinse thoroughly. Use this method every 3-6 months to remove mineral buildup.
Can I use ground coffee with my Keurig K-Mini?
Yes, with the My K-Cup reusable filter, you can brew ground coffee instead of K-Cups, giving you more flavor options and saving money.
Why isn’t my Keurig brewing properly?
Check if the water reservoir is correctly seated, ensure the machine is powered on and heated, and run a cleaning cycle or descale if needed. Mineral buildup can hinder performance.
Is the K-Mini travel mug friendly?
Yes, it accommodates travel mugs up to 7 inches tall thanks to its removable drip tray, making it convenient for on-the-go coffee lovers.
How do I clean the drip tray and water reservoir?
Remove these parts and wash them with warm, soapy water weekly. Rinse thoroughly and dry before reassembling to keep your coffee tasting fresh.
Enjoy Your Perfect Brew with Confidence
Setting up your Keurig K-Mini is straightforward, and with proper maintenance, it will serve you reliably for years. Regular descaling and cleaning ensure your coffee remains flavorful and the machine functions smoothly. Remember to use quality water and consider a reusable filter for more options and savings. Now, enjoy your freshly brewed coffee with ease and confidence every day!
Affiliate disclosure: As an Amazon Associate we earn from qualifying purchases. Prices and availability are accurate as of the time of publishing.
Columbus Day / Indigenous Peoples' Day Picks
long weekend sales
As an affiliate, we earn on qualifying purchases.